I DO NOT TAKE ANY RESPONSIBILITY FOR THIS GUIDE. USE AT YOU OWN RISK. USE IT ONLY IF IT IS THE LAST THING YOU CAN DO TO TRY AND SAVE YOUR PLAYER |
A few things:
- This was tested on a Sansa e250, after it has been erased using the Disk Utility, in Mac OS X Leopard. The player then showed a black screen with the scroll wheel on. No recovery mode was accessible. The player was eventually fixed using this method.
- This was tested successfully twice after the incident just to make sure this really works.
- Other guides that I saw are outdated and not organized enough for users who are new to both the pc and Linux OS.
- This guide includes 3 main steps:
- Lunching a Linux Live CD (Ubuntu in this case)
- Getting the appropriate files.
- Working with the Terminal program.
For questions/suggestions email to barskir@gmail.com
Credit goes to MrH for the e200tool
http://daniel.haxx.se/sansa/e200tool.html
Credit goes to MrH for the e200tool
http://daniel.haxx.se/sansa/e200tool.html
I wish you Good Luck!
Step 1: Lunching a Linux Live CD (Ubuntu in this case)
- Get a Linux Live CD distribution. I recommend Ubuntu. Get Ubuntu from here: http://www.ubuntu.com/getubuntu/download
- You will download an Image file in *.ISO format which will be around 700mb. Burn the Image file using almost any CD burning software.
- Set up your BIOS to boot from your CD-ROM drive. Insert your Ubuntu CD at computer startup, and boot into the system. If you are new to Linux, don’t get scared, it should look like this:

All right, so far so good!
Step 2: Getting the appropriate files.
- We will need 4 files:
- e200tool
- BL_SD_BOARDSUPPORTSD.ROM
- PP5022.MI4
- Sansa.fmt
- To get the e200tool file, you now need to open up the Terminal window: In the upper menu, left corner, go to Applications>Accessories>Terminal

In your Terminal window, copy and paste the following, and hit Enter:
| cd ~ mkdir e200tool cd e200tool wget http://daniel.haxx.se/sansa/e200tool/e200tool chmod +x e200tool |
After all is done, you should get these lines:

What we have now is, the e200tool on our machine in the Home Folder.
Go in the upper menu again, Places>Home Folder, so now you see the e200tool folder, and when you go inside you’ll see the e200tool app.

Now, we only need the rest of the files. So simply download them from here:
http://www.box.net/shared/4smvei56oo
After downloading, extract the files into the e200tool folder that we have created before, and make sure that it looks like that:

Note: if you are getting theses files from another source, just make sure that the file extension is in UPPER CASE LETTERS. I don’t know why but it didn’t work for me otherwise. As strange as it can sound.
Step 3: Working with the Terminal program.
- Get your Terminal window up front. Turn on your Sansa Player and boot into manufacturing mode using the following:
- Switch and enable the Hold Button. You should see an orange mark.
- Hold down the Select Button (the center round button) and turn the player on.
- Wait for at least 5 seconds, and then connect the cable.
- Open the Terminal and type in the following and hit Enter:
| lsusb |
You should get the following line, this means that the device is connected:

Still, if it doesn’t work, try these steps without the first step. Just try without the Hold Button on. Try Several times; you should get it working eventually.
In the next step keep the REC button on your player pressed all the way through the next steps! Paste the next code in the Terminal window while the REC button is pressed, and hit Enter.
| sudo su ./e200tool recover BL_SD_BOARDSUPPORTSD.ROM |
The Terminal will show the following now, and you still should be holding the REC button on your player:
| e200tool v0.2.3-alpha (c) by MrH 2006, 2007 Searching for device 0781:0720 ... found! Initializing USB stub (4780 bytes) ... done! Writing 'BL_SD_BOARDSUPPORTSD.ROM' to address 0x10600000 Searching for device 6666:e200 ... 9 found! Write at 0x10660198 Write done! Running from address 0x10600000 Searching for device 6666:e200 ... found! Execution started! |
You may now notice that the scroll wheel blinks once and then the logo appears. The player will be now mounted in recovery mode, with a 16 mg disk. The mounted “disk” should open automatically, if not search for it in File System/media/.

You can now release the REC button.
Return to the Terminal, and paste the following lines(hit Enter):
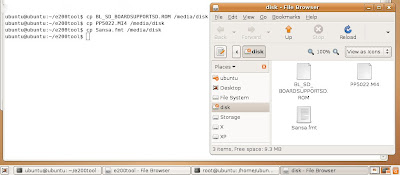
| cp BL_SD_BOARDSUPPORTSD.ROM /media/disk cp PP5022.MI4 /media/disk cp Sansa.fmt /media/disk |
Note: that if the player was mounted with a different name other than “disk”, you should change the device name in the code:
e.g
| cp BL_SD_BOARDSUPPORTSD.ROM /media/device name cp PP5022.MI4 /media/device name cp Sansa.fmt /media/device name |
You may also copy these 3 files manually to the mounted disk. It should look like this:

- Unmount the device using the next code:
| umount /media/disk |
- Disconnect the cable, the player should now reformat itself, and write a new image file.
Switch the Hold button back, if it is locked, and turn off the player. If necessary hold the power button for 20 seconds to turn the player off.
Now turn it on and it should work again!

